Docker Overview
December 24, 2020
Check out my project code @ Github
Abstract
We often try to simplify things but usually end up making them much more difficult. Similar is the case with code. We code, install additional dependencies, and remove redundancies. With this 3-step process, we sometimes end up with a very difficult process to explain how to reproduce the results and rerun the experiments. This blog explains Docker, which is a tool designed to make it easier to create, deploy, and run applications by using containers.
Earlier Work
Before Docker was introduced, virtualization of resources was used which provided independent virtual machines for clients to work upon. But this came with the price of heavy operating systems which may easily exceed over 1GB despite supporting light applications (around 300MB). This drawback led to the advent of containers (Docker).
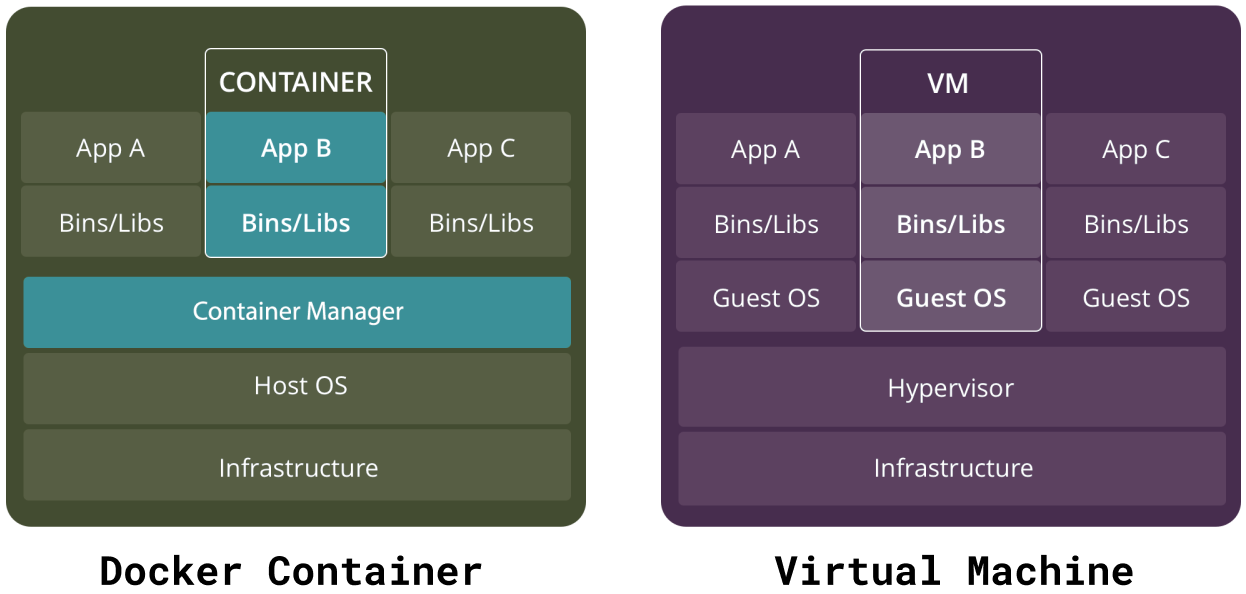
What is Docker?
Docker is based on containers which run on shared resources of your PC but in isolation as shown in the following architecture. A container is an efficient mechanism to keep your software components together and maintainable. You can also run multiple containers at the same time to support a service. Docker also provides a mechanism to start all the containers concerned with that service with one command using Docker Compose. We will talk about it later.
Dockerfile
A Dockerfile is a simple text file that contains a list of commands that the Docker client calls while creating an image.
Working Dockerfile for conda environemnt.
FROM continuumio/miniconda3

WORKDIR /app

# Create the environment:
COPY environment.yml .
RUN conda env create -f environment.yml

# Make RUN commands use the new environment:
SHELL ["conda", "run", "-n", "myenv", "/bin/bash", "-c"]
RUN python -c "import numpy"

# The code to run when container is started:
COPY run.py .
ENTRYPOINT ["conda", "run", "-n", "myenv", "python", "run.py"]
- FROM creates a layer from the continuumio/miniconda3 Docker image.
- COPY adds files from your Docker client’s current directory.
- RUN builds your application with make.
- CMD specifies what command to run within the container.
- ENTRYPOINT is to set the image’s main command, allowing that image to be run as though it was that command.
- SHELL instruction allows the default shell used for the shell form of commands to be overridden. The default shell on Linux is ["/bin/sh", "-c"], and on Windows is ["cmd", "/S", "/C"]
Container Image is built using
$ docker build -t <app_name>:<label_name> .
To make sure certain package is installed we can add,
RUN echo "Make sure flask is installed:"
RUN python -c "import flask"
The image defined by your Dockerfile generate containers that have ephemeral states. It gets destroyed as soon as process is over. To access files in container we may either bash into container to run the command which generates a new file which we need on our local file system and then use $docker cp to tranfer to local file system. And if we wish to use files from our local system in docker container we may mount those files either using COPY when generating container or we may mount it at runtime using volume. We can also specify volume which can be utilized by both local file system and docker.
$ docker build -t dockerized-run .
$ docker run --rm -it -v <PATH-TO_IMAGES>/images:/app/images --entrypoint=/bin/bash dockerized-run

(base) root@b74706db6f68:/app# ls
environment.yml  images
(base) root@b74706db6f68:/app# cd images
(base) root@b74706db6f68:/app/images# ls
out.png  test.png
Volume
- Mounting volume at runtime.
$ docker run --rm -it -v <source-path>:<target-path> <docker-container-name>
The above command will run docker with specified volume (-v) mounted in the
- Mounting volume at build time using docker compose.
version: "3.9"
services:
  deeplearning:
    build: .
    volumes:
      - ./images:/app/images
Here volume keyword specifies to mount current directory on local file system to /images on container. So the changes made to those files mounted at /images will also be reflected in local file system.
Docker Compose
It is used to start multiple containers as a single service. You may start services like react and flask server together as a service.
version: "3.9"
services:
  web:
    build: .
    ports:
      - "5000:5000"
  redis:
    image: "redis:alpine"
Taken from docker compose example at docker compose docs. Here we are starting 2 services web and redis. Web is build using dockerfile as specified by . (dot) pointing towards dockerfile and port binds the container and the host machine to the exposed port, 5000. This can also be done using dockerfile by using EXPOSE.
version is used to specify that we want the details of the version of Docker Compose.
Application
Lets also talk about dockers application in AI research. Now given todays deep learning systems and its other applications, the need for using sameversion of library becomes necessary for inducing reproducibilty in these models. The most common package manager used for python is anaconda.
name: myenv
channels:
  - conda-forge
dependencies:
  - python=3.8
  - numpy
We build it with below specified dockerfile.
FROM continuumio/miniconda3

COPY environment.yml .
RUN conda env create -f environment.yml

ENTRYPOINT ["conda", "run", "-n", "example", \
            "python", "-c", \
            "import numpy; print('success!')"]
In this environment, we install Python 3.8 and NumPy, and when we run the image it imports NumPy to make sure everything is working. This can bloat upto 950MB. Where is all the disk space being going?
- Conda caches downloaded packages.
- Conda base environment where toolchain is installed takes huge space. For example, when we install
continuumio/miniconda3, it comes with its own python which we dont intend use.
First problem can be solved by removing those cached files. Second problem is conda specific and hence unavoidable but we can do away with it at runtime.
# The build-stage image:
FROM continuumio/miniconda3 AS build

# Install the package as normal:
COPY environment.yml .
RUN conda env create -f environment.yml

# Install conda-pack:
RUN conda install -c conda-forge conda-pack

# Use conda-pack to create a standalone enviornment
# in /venv:
RUN conda-pack -n example -o /tmp/env.tar && \
  mkdir /venv && cd /venv && tar xf /tmp/env.tar && \
  rm /tmp/env.tar

# We've put venv in same path it'll be in final image,
# so now fix up paths:
RUN /venv/bin/conda-unpack


# The runtime-stage image; we can use Debian as the
# base image since the Conda env also includes Python
# for us.
FROM debian:buster AS runtime

# Copy /venv from the previous stage:
COPY --from=build /venv /venv

# When image is run, run the code with the environment
# activated:
SHELL ["/bin/bash", "-c"]
ENTRYPOINT source /venv/bin/activate && \
           python -c "import numpy; print('success!')"
The above solutions is provided here.
Follow me on twitter @theujjwal9